Panel Functionality
Information Display:
Panels show real-time mission data from the Front Line server with minimal delay.
Customization Options:
Freely move and position panels anywhere on your screen.
Customize panel order and arrangement to suit your preferences.
See example layouts in the screenshots (highlighted with red rectangles).
Interface Optimization:
Position panels to avoid interfering with gameplay.
Show only the elements you need, such as just the timer.
Spitfire | Bf 109 |
|---|---|
|
|


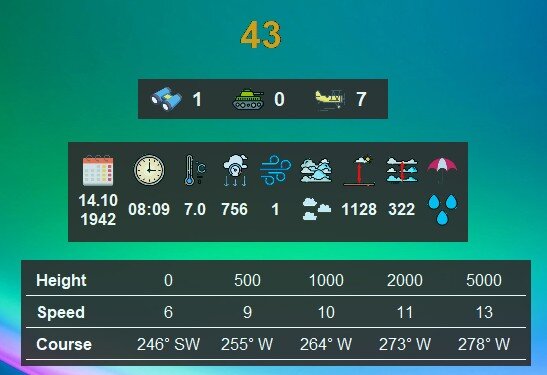
Blocks of information in the form of cards
Current mission time:
Remaining time until the end of the mission
Information about the current mission:
Date
Time
Temperature
Atmospheric pressure
Turbulence
Cloud cover
Height above the clouds
Height of the cloud layer
Amount of precipitation
Composition of the enemy or ally team (depending on which side you choose):
Number of players on the planes
Number of players on tanks
Number of players in the lobby
Wind information on the current map:
Height
Speed
Direction (where the wind is blowing from)
Vehicles spec panel
Collapsible side panel with map target statuses (right side)
Collapsible side panel with map supply statuses (left side)
IMPORTANT:
Windowed Mode:
Run the game in windowed mode to ensure panels display on top of the game window.
Configuration File Setup:
It will make the drop-down lists on the panels clickable and allow you to move while the map is enabled.
Open the
startup.cfgfile at the following path:D:\Games\IL-2 Sturmovik Great Battles\data\startup.cfgIn the
[KEY = input]section, set theexclusive = 0parameterTo automatically detect the user's aircraft (only works offline), you need to enable logging in the game for the panel with aircraft specifications
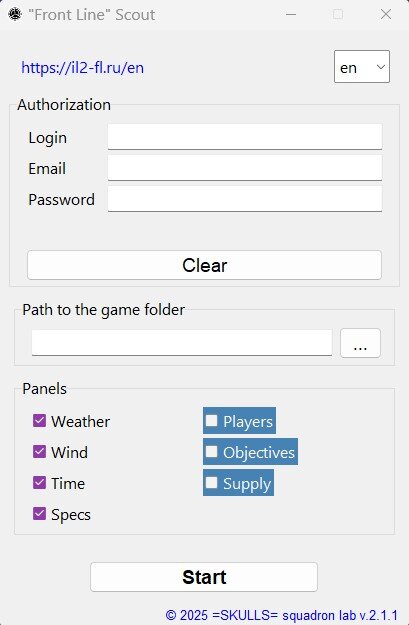
In the
[KEY = system]section, set the parametermission_text_log = 1andgamelog = 1In the program's start window, you need to specify the path to the game folder
Panel Movement Mode:
Press the
Okey (default map key in the game) to activate movement mode.If there is a mismatch with the card, you can press the
backspacebutton in flight
Panel Controls:
To move a panel: Click and hold the left mouse button, then drag to the desired position.
To exit movement mode: Right-click on any panel.
A more detailed description:

remaining mission time in minutes. Updated once every 30 - 90 seconds, changes color to red when 15 minutes are reached, and updates every 15 - 30 seconds when 5 minutes are reached.

the number of players in the selected coalition, updated once every 30 to 90 seconds.
number of pilots

number of tankers

number in the lobby


information about the current mission, updated once during the entire mission
date |
| format DD.MM.YYYY | ||||||||
time |
| HH:MM format 24 hours | ||||||||
temperature |
| format X.X in degrees Celsius | ||||||||
atmospheric pressure |
| in millimeters of mercury (mm Hg) | ||||||||
turbulence |
| a coefficient between 0 and 1, where 1 is the maximum turbulence | ||||||||
cloud cover |
|
| ||||||||
height to the clouds |
| in meters | ||||||||
cloud layer height |
| in meters | ||||||||
precipitation |
|
|


wind data, altitude in meters, speed in m/s, and direction in degrees (from where the wind is blowing)

data for the selected technique, any data you want, is added through the Json. file. For example, I added a couple of planes on both sides
The data is taken from the json file.
The ability to automatically detect the user's aircraft has been added, but it only works offline.
Here are the parameters for the strings:
"30 minutes": { # Name of the parameter
	"value": "1,3 ata\n2500 rpm", # Parameter value, "\n" symbol - line break
	 "color": "orange", # The parameter color can be set to red, green, blue, white, black, yellow, orange, gray, cyan, magenta, brown, purple, pink, and others
	 "size": 14, # Font size of the parameter
	 "type": "bold" }, # Bold font
The minimal record will look like this (white text, not bold, default font size):
"30 minutes": {"value": "1,3 ata\n2500 rpm"} - collapsible side panel showing map target statuses. Updates every 30-90 seconds, includes a refresh button that can be pressed once every 30-90 seconds. The panel appears in movement mode when the mouse pointer approaches the right edge of the screen.
 - a side-by-side panel that can be hidden to display the targets required for supply. It is also updated every 30-90 seconds, and there is a refresh button that can be clicked once every 30-90 seconds. The panel appears when the mouse pointer is moved to the right. Objects appear when any of the airfield resources drops below 70%, and the same applies to cities.


Edited by NooBAsTiK
корректировка описания
What's New in Version 2.1.2
Released
-
 1
1